
Figma has become one of the most popular design tools for professionals and beginners alike. It allows you to create stunning designs, prototypes, and user interfaces collaboratively. One of the best ways to elevate your design work in Figma is by adding custom fonts. This article will walk you through the process of adding fonts to Figma, making your designs unique and aligned with your brand’s style.
What is Figma?
Figma is a cloud-based design tool that lets users create user interfaces (UI), websites, and other graphic designs. Unlike traditional design software, Figma operates in the browser and provides real-time collaboration features. This means that multiple users can work on the same project simultaneously, making it great for design teams.
Why Use Custom Fonts?
Using custom fonts in your designs helps to:
- Establish Brand Identity: Unique fonts can communicate your brand’s voice and personality.
- Enhance Readability: Choosing the right font can improve the readability of your text.
- Create Visual Hierarchy: Different fonts can help differentiate headings, subtitles, and body text.
Now, let’s get into how you can add custom fonts to Figma.
How to Add Fonts to Figma
Adding fonts to Figma can be broken down into easy steps. Here’s a detailed guide to help you through the process.
Step 1: Choose Your Fonts
Before adding fonts to Figma, you’ll want to choose the fonts you wish to use. You can find fonts on various websites that offer free or paid options, such as:
- Google Fonts: A massive library of free fonts that you can use in your projects.
- Adobe Fonts: If you have an Adobe subscription, this is another excellent resource for high-quality fonts.
- Font Squirrel: A website that offers a wide selection of free, commercial-use fonts.
- DaFont: This offers both free and paid fonts, but be sure to check the licensing agreements.
Step 2: Download and Install the Fonts (for Desktop Users)
If you are using Figma on your desktop application, you need to download and install the fonts you want to use:
- Download the Font Files: Most fonts will be in a ZIP file format. Extract the files to a location you can easily access.
- Install the Fonts:
- Windows: Right-click on the font file and select “Install.” You may need to do this for all variations (like bold or italic) separately.
- Mac: Double-click the font file and click “Install Font” in the Font Book.
Step 3: Using Figma with the Installed Fonts
Once you’ve installed the fonts on your operating system, you’re ready to use them in Figma:
- Open Figma: Launch the Figma desktop app or access Figma via your web browser.
- Create or Open a Project: Select or create a new project where you want to use the new font.
- Select the Text Tool: Click on the Text tool (T) from the toolbar on the right side or simply press the ‘T’ key on your keyboard.
- Add Text: Click on the canvas and type your text.
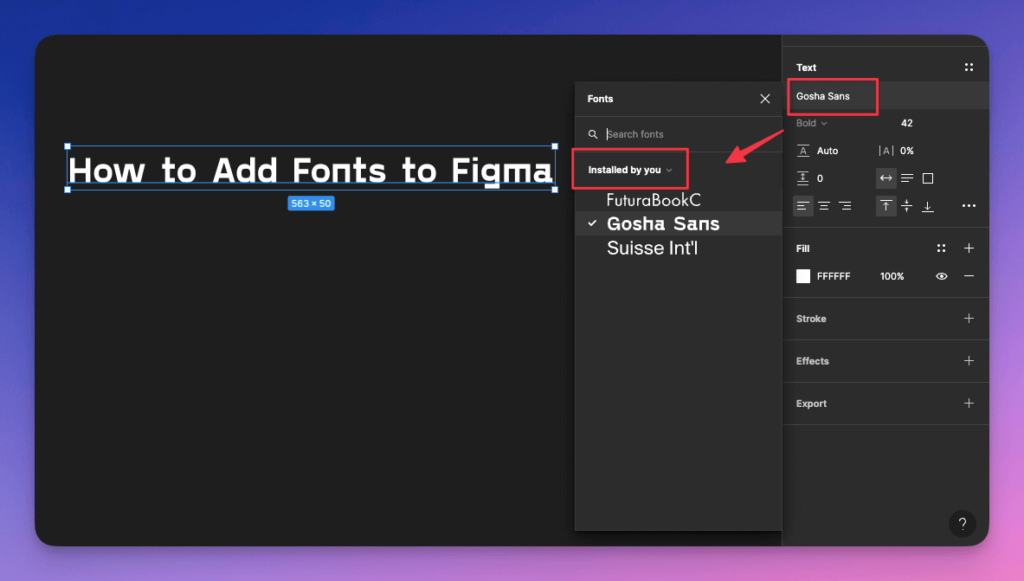
- Change the Font: With the text selected, go to the right sidebar and find the Font dropdown menu under the “Text” section.
- Select Your Font: Scroll through the list of available fonts to find your newly installed font. Click on it to apply.
Step 4: Using Fonts in Figma on the Browser
For those using Figma in the web browser, you’ll need to use the Figma font helper:
- Install the Figma Font Helper: This desktop application allows you to use local fonts while working in the Figma web app. You can download it from the Figma website.
- Open the Font Helper: After installing, open the Figma Font Helper application. It will run in the background and allow your browser to access local fonts.
- Open Figma: Go to your Figma project in your web browser.
- Add and Use Fonts: Now, you can add text and access the installed fonts just as you would in the desktop app.
Additional Tips for Working with Fonts in Figma
- Font Pairing: When working with multiple fonts, ensure that they complement each other. Pairing a bold font with a lighter one can create an attractive visual hierarchy.
- Text Styles: Use Figma’s text styles feature to maintain consistency throughout your designs. You can save frequently used font combinations as styles that you can apply to multiple text layers.
- Font Licensing: Always check the licensing of fonts before using them in commercial projects. Some fonts are free for personal use but require a license for commercial use.
Troubleshooting Common Issues
Even with these steps, you may encounter a few issues when adding fonts to Figma. Here are some potential problems and solutions:
- Fonts Not Showing Up: If your installed fonts don’t appear in Figma, make sure the Figma Font Helper is running (for browser users) or restart Figma (for desktop users) to refresh the font list.
- Missing Font Styles: Check if you have installed all variations of the font (e.g., bold, italic) for those styles to become available in Figma.
- Corrupted Font File: If a font fails to load or displays incorrectly, it may be corrupted. Try re-downloading it from a different source.
FAQs
- Can I use Google Fonts in Figma?
- Yes! Google Fonts can be easily accessed in Figma without needing to install them on your system.
- Is it necessary to install fonts if I’m using Figma on the web?
- If you’re using Figma in a web browser, you need to install the Figma Font Helper to access local fonts.
- What should I do if I have trouble finding the installed font in Figma?
- Ensure that the Figma Font Helper is running and try restarting Figma if you don’t see the fonts.
- Are there any restrictions on fonts used in Figma?
- Yes, some font licenses restrict usage. Always check the licensing agreements before using a font in commercial work.
- Can I upload fonts to Figma directly?
- No, Figma does not currently support uploading fonts directly. You must install them on your system or use Google Fonts.